
Rose Tyler’s Empty Child Jacket- Version 2
It’s been a year since I made my first Empty Child jacket and as much as I like my first jacket, I wanted to remake it. There were problems with my first jacket, mostly due to the fact it was the first time I ever made a jacket like this. Most of the problems had to do with fitting and little nit picky things, but it still bothered me. I believed I could do better, so I spent months doing more research on the jacket so I could create a better, more accurate jacket.
Probably the most annoying thing about doing more research is that my original post about the jacket usually showed up in the searches as one of the top posts. Good for popularity reasons, bad for continuing jacket research. (Someone tell me I’m not the only one who made the jacket from scratch!) I’m not tooting my own horn, but I do think this is of note because it cause me to take me even longer than I wanted to in finding new reference photos and information on the Firetrap Harrie.
After becoming frustrated finding new research photos and finding the information I already had pop up more than I’d like it to, I attempted to buy a Firetrap Harrie jacket just to see how it was made and create my own reference photos. That ended up not working out so I went back to searching for reference photos and staring at screen captures for more information.
After almost year of doing research, I decided it was time to make the jacket over again with the intention of wearing it to the 2014 Phoenix Comicon. (It might’ve helped that John Barrowman would be a guest at the convention again) I ended up not finishing it in time to wear it to the Comicon, but after the Comicon was over I was able finished it.
Here’s what version 2 looks like….

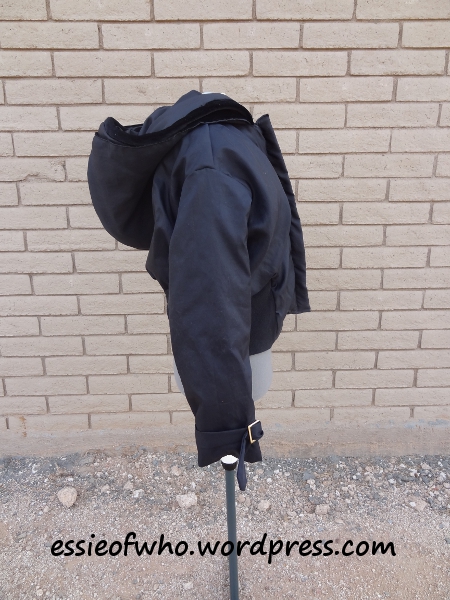
This version is currently far more accurate than the first one. It has several construction improvements but it’s still not an exact reproduction of the Firetrap Harrie. (It’s missing little details, most notably the snaps in the front of the jacket. That was a mistake on my part. I was going to add the snaps to the flap that goes over the zipper but I forgot and sewed the zipper onto the jacket before I could add the snaps.)
I made the jacket out of Sports Nylon instead of Rip Stop. I still don’t see much of a difference between the two fabrics, but I’m sure there is because if they were the same, they’d have the same name. Still, I’m not picky about the fabric for my jacket. As long as I can use it and know where to get more if I need it, I’m fine.
From my research, it appears the real jacket could possibly be made of waterproof fabric. (Makes sense since it’s a cold-weather jacket) It’s hard for me to find waterproof fabric where I live (I’ve been looking for over a year…) let alone in the screen accurate brown color, so I used black Sports Nylon instead. I was planning to buy white Sports Nylon and dye it brown, but since I’m getting conflicting messages about if dying nylon is even possible, I’m going to say no to dying nylon and that I’ll stick with black because it’s so widely available. (Joann’s seems to always have it in stock)
Also, according to what I’ve read cosplayers who have the screen accurate jacket say about their jackets, it’s a warm jacket. Since I wanted my jacket to not be used as a costume piece only but as a fully functional jacket in cold weather, I wanted my jacket to be warm too. So, I sewed a layer of quilt batting between the lining and the Sports Nylon outside to add a layer of warmth. I did this with my first jacket, but this time I used thicker batting. I wasn’t intending on using thicker batting, it was just what I had on hand from a previous project. If I make another jacket, I’m going to use black quilt batting. I used white batting and… well… I had to make sure every seam was sewn well so the white batting wouldn’t show through. It was hard and I don’t want the white fluff to show through my black jacket lining again.
One of the details this new jacket has that the first one didn’t is the double hood. The real jacket has two hoods, the outer one has a zipper and when unzipped, it lays flat. The inner hood is just an ordinary hood, doesn’t have anything super fancy like a zipper, and is probably meant for adding another layer of warmth to the head. I liked this idea so I made two hoods for my jacket….

Both hoods have a core of quilt batting for warmth (Outer hood) and to add more body and structure the thin lining fabric (Inner hood). They also have a strip of velvet around the edge of the hood.
The real jackets have what looks like faux fur or something similar in the same location. I used up all my nice black faux fur on another project, but I did have stretch velvet in my fabric stash. I thought it would be a good stand-in so I used it. It also helped that it stretched, which was great because it curved around the curves the hood has. Like bias tape would around the edge of a skirt.
The buckles around the sleeves were also improved. I found a photo online of the back of the sleeves and it had a loop of fabric to keep the fabric in place and not slip over the edge of the sleeve and flop around. (I had this problem with my first jacket and it was really getting on my nerves) I also changed the way I wove the fabric through the belt buckle to look like the way the real jacket looks like. Finally, I found some nice buckles to use on the sleeves. The new buckles are meant for sewing and jacket making while the first jacket’s buckles were meant for purses. The purse buckles were the best buckles I could find at that time, but now that I have access to a different fabric store with different items in stock I can find buckles I like better much easier.
Although this jacket is far better than the first one I made, I’m still annoyed with the way it fits. I have jackets similar to this one, with ribbed knit in the bottom of the jacket, but I cannot seem to get the right balance between the ribbed knit, size of the main body of the jacket, and my body. The first time I made the jacket the fitting problems was due to growth spurts, but now the growth spurts have ended and I’m still having fitting problems. Not sure if I’ll end up making yet another jacket, but if I do, it’s certainly something I want to fix.
In other related Empty Child jacket news, I do want to make a tutorial about how I make my jacket(s). I’m holding off creating them because I’m still unsatisfied with the way the jacket turns out. Once I fix what I don’t like about my jacket, I’ll try to type one up.
Before I end this post, I’d like everyone to know that as much as I appreciate being asked if I’ll take a commission to make a jacket for them (It helps my sewing confidence knowing others like my sewing so much they want me to make one for them), I do not take sewing commissions. I also will not be making and selling pre-made versions of this jacket. I want to sell items I sewed and I’m confident will be of highest quality I can create. This jacket? Um… I’m sure it will be of high quality. It’s great for me, but not for others. That’s why I wanted to create a tutorial so others can read it and possibly make their own… or at least show it to someone who knows how to sew and will understand how it is possible to make the jacket from scratch.
That’s all for now!

Sketchbook Saturday- Pondering Elf
You May Also Like

Trying Tailors’ Chalk from Amazon

Daenerys Targaryen Wedding Dress
