
Snow White’s Mirror Mirror Dress~ Part 4
Well, this is the final post I have to make about this costume! (Took me long enough!) I’ll make links all the posts to a page dedicated to the progress in making this dress in the costume page. (I haven’t done it yet. Still working on organizing the page.)
Well, after completing the skirt and the bodice, I needed to attach the sleeves to the bodice. The first sleeves I attached to the bodice was the blue sleeves.
Here’s what they looked like pinned and waiting to be sewn onto the bodice…

Before I began to work on the orange sleeves, I had to sew the trim to the top of the bodice. I sewed two layers of lace, one higher than the other, and one band of pearls to the top of the highest layer of lace. It looked like this…

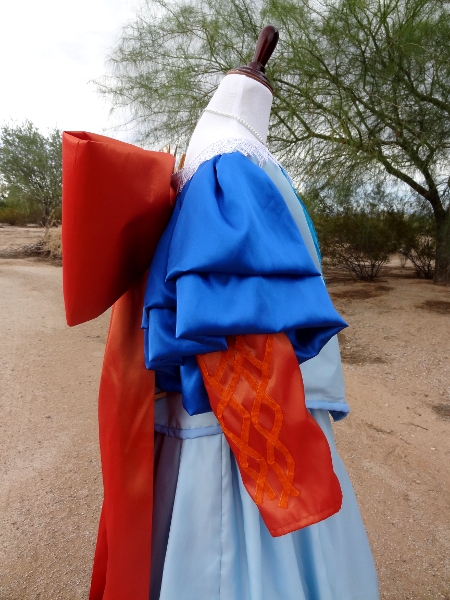
After that, I began to work on the orange sleeves. I used the McCall’s 6629 for the orange sleeves. I made the sleeves out of orange/red taffeta (It looks more orange than red). I also used the fabric to make the bow. (I like to call it “The Big, Orange Bow of Awesomeness”) I used longer sleeve pattern for view B to cut out the sleeve. After I cut the fabric out, I pinned and sewed the sleeve ribbon detail design. I used orange organdy ribbon for the detail mostly because I thought it looked pretty and was easier for me to use instead of making strips of fabric. (I’ve recently become more “lazy” when it comes to making a costume accurate. I usually blame this on my busy life and being tired from working.)
Here’s what the sleeves looked like after I finished sewing the detail onto the sleeves…

After I finished sewing the detail onto the sleeves, I finished sewing the sleeves together and onto the bodice. I also added some lining to the sleeves because the taffeta was thinner than I expected.
And this is what the bodice looks 100% competed…

The only thing left was the bow.
I knew how to make the bow and how I wanted to attach it to the bodice (With snaps) but I didn’t know how I wanted the bow to look. I wanted it to be larger than the bows that came with the Simplicity and McCall’s Mirror Mirror patterns, but not really as big as the bow the actual dress has. After I finally decided on what I wanted the bow to look like, and my new sewing machine came in the mail, I began to work on the bow.
I ended up using McCall’s Mirror Mirror pattern (Number 6629, view B) for the bow. I liked how big it was and that I didn’t have to make a pattern. 🙂
So, the costume is now complete! After everything was finished, I put the costume on my dress form (Held on by clothes pins), took the dress form outside, and took photos of the whole thing completed….
Front…

Back…

Side…
I want to get some photos of me wearing the costume soon, but I need to get some time and wait for the weather outside to do it. 🙂


5 Comments
Pingback:
Anonymous
Where did you find that lovely lace??
essieofwho
I found it at Joann’s. If I remember correctly, it is called Venetian lace and is part of the Wright’s Trim line. Simplicity makes Wright’s Trim, but I don’t see it for sale on their website. I think Joann’s might still have it for sale, but ebay and amazon would be good places to look for it as well.
Anonymous
Thank you! I love this movie, and this dress. The lace looks so close!! 🙂
essieofwho
You’re welcome and thank you! I’m glad I could help! 😀